자바스크립트 프로토타입
프로토타입
자바스크립트는 프로토타입 기반의 객체지향 프로그래밍 언어이다.
자바스크립트의 모든 객체는 메서드와 속성을 상속받기 위해 프로토타입 객체를 가진다.
ES6에서 클래스가 도입되었지만, 기존의 프로토타입 기반에서 클래스 기반 언어로 바뀐 것은 아니다.
객체 지향 프로그래밍
객체 지향 프로그래밍의 정의는 다음과 같다. [1]
객체 지향 프로그래밍은 컴퓨터 프로그래밍의 패러다임 중 하나이다.
객체 지향 프로그래밍은 컴퓨터 프로그램을 명령어의 목록으로 보는 시각에서 벗어나 여러 개의 독립된 단위, 즉 “객체”들의 모임으로 파악하고자 하는 것이다.
각각의 객체는 메시지를 주고받고, 데이터를 처리할 수 있다.
객체 지향 프로그래밍은 필요한 데이터를 추상화(abstraction) 시켜 상태와 행위를 가진 객체로 만들고 객체 간의 상호작용을 통해 프로그래밍하는 것이다.
만약 사람이라는 객체를 만들 때 우리의 프로그램에서는 사람의 성별과 나이만 필요하다면 아래와 같이 만들 수 있다.
const person = { |
단순히 데이터를 저장하는 것 뿐만 아니라 행위를 객체에 등록할 수 있다.
const person = { |
이처럼 객체의 상태에 해당하는 데이터는 프로퍼티, 행위에 해당하는 데이터를 메서드라고 부른다.
상속과 프로토타입
상속(inheritance)은 어떤 객체의 프로퍼티 또는 메서드를 다른 객체가 그대로 사용할 수 있는 것을 말한다.
자바스크립트는 프로토타입 기반으로 상속을 구현하여 코드의 중복을 제거한다.
function Person(name) { |
위 코드의 경우 getName 메서드는 공통으로 사용되지만, 인스턴스가 생성될 때마다 인스턴스 내부에 생성된다.
이는 불필요한 메모리를 사용하고 인스턴스가 생성될 때마다 메서드를 생성하기 때문에 퍼포먼스에도 좋지 않은 영향을 줄 수 있다.
이러한 문제는 자바스크립트 프로토타입 기반의 상속으로 해결할 수 있다.
function Person(name) { |
Person 생성자 함수로 생성한 모든 인스턴스는 상위 객체 prototype의 모든 프로퍼티와 메서드를 상속받는다.
이렇게 함으로써 내용이 동일한 메서드를 상속을 통해 공유하여 사용하는 것이다.
프로토타입 객체
프로토타입 객체(이하 프로토타입)는 객체 간 상속을 구현하기 위해 사용된다.
프로토타입은 어떤 객체의 상위 객체 역할을 하는 객체로 다른 객체에 공유 프로퍼티 또는 공유 메서드를 제공한다.
프로토타입을 상속받은 하위 객체는 상위 객체의 프로퍼티와 메서드를 사용할 수 있다.
프로토타입은 객체가 생성될 때 객체 생성 방식에 의해 결정되고 객체의 [[Prototype]]이라는 내부 슬롯에 저장된다.
[[Prototype]] 내부 슬롯에 직접 접근은 불가능하지만 proto 접근자 프로퍼티를 사용해 간접적으로 프로토타입에 접근할 수 있다.
__proto__ 접근자 프로퍼티
모든 객체는 proto 접근자 프로퍼티를 통해 [[Prototype]] 내부 슬롯에 간접적으로 접근할 수 있다.
const user = { id: 'testId' }; |
내부 슬롯은 프로퍼티가 아니기 때문에 자바스크립트에서는 원칙적으로 직접 접근이나 호출 방법을 제공하지 않는다.
하지만 일부 슬롯만 간접적으로 제공하는데 그것이 __proto__이다.
접근자 프로퍼티는 자체적으로 값을 가지지 않고 다른 데이터 프로퍼티를 읽거나 저장할 때 사용하는 [[Get]], [[Set]]으로 구성된 프로퍼티이다.
__proto__접근자 호출 시 [[Get]]이 호출되고 __proto__접근자를 통해 새로운 프로토타입을 할당하면 [[Set]]이 호출된다.
const obj = {}; |
__proto__접근자 프로퍼티는 객체가 소유하고 있는 것이 아니라 Object.prototype의 프로퍼티이다.
모든 객체는 상속을 통해 Object.prototype.__proto__접근자 프로퍼티를 사용할 수 있다.
const user = { id: 'testId' }; |
위 예시에서 user는 __proto__를 소유하지 않는다. __proto__는 모든 객체의 프로토타입 객체인 Object.prototype의 접근자이고 모든 객체의 __proto__와 Object.prototype은 같다.
프로토타입에 접근하기 위해 접근자 프로퍼티를 쓰는 이유는 순환참조가 생성되어 프로토타입 체인 탐색 시 무한 루프에 빠지는 것을 방지하기 위해서이다.
const parent = {}; |
위 코드가 성립된다면 child의 프로토타입은 parent이고 parent의 프로토타입은 child가 된다.
이 경우 child에서 프로토타입 체인 탐색 시 child와 parent를 무한히 반복하는 무한루프가 생성된다.
이 때문에 프로토타입 체인은 단방향 링크드 리스트로 구현되어야한다.
그렇기 때문에 프로토타입 교체 시 확인할 수 있도록 __proto__접근자를 통해 교체하도록 구현되어있다.
함수 객체의 prototype 프로퍼티
(function() {}).hasOwnProperty('prototype'); // true |
함수 객체는 prototype 프로퍼티를 가지고 있고 일반 객체는 가지고 있지 않다.
함수 객체의 prototype 프로퍼티는 생성자 함수로 사용될 때 생성할 객체의 프로토타입을 가리킨다.
화살표 함수의 경우 생성자 함수로 호출할 수 없어서 prototype 프로퍼티를 가지고 있지 않으며 프로토타입도 생성하지 않는다.
마찬가지로 메서드 축약 표현으로 정의한 메서드도 위와 같다.
const User = id => { this.id = id; }; |
Object.prototype을 상속받은 모든 객체의 __proto__접근자 프로퍼티와 함수 객체의 prototype 프로퍼티는 같은 프로토타입을 가리킨다.
(function(){}).prototype.__proto__ === Object.prototype; // true |
둘의 차이점이 있다면 사용하는 주체가 다르다는 점이다.
__proto__접근자는 객체가 자신의 프로토타입에 접근 또는 프로토타입을 교체하기 위해 사용하고
prototype 프로퍼티는 생성자 함수가 자신이 생성할 객체를 할당하기 위해 사용한다.
리터럴 생성 객체
생성자 함수에 의해 생성된 객체는 프로토타입의 constructor 프로퍼티에 의해 생성자 함수와 연결된다.
리터럴 표기법으로 생성된 객체도 프로토타입이 존재한다.
const obj = {}; |
obj는 Object 생성자 함수로 생성하지 않았지만, Object 생성자 함수와 constructor로 연결되어있다.
위 사실만 놓고 봤을 때 리터럴 생성 객체는 생성자 함수로 생성되는 것으로 생각할 수도 있다.
하지만 ECMAScript 사양을 보면 결국 같은 빈 객체를 생성하는 것은 같으나 세부적인 내용은 조금 다른 것으로 확인된다.
이를 통해 객체 리터럴로 생성한 객체는 Object 생성자 함수로 생성한 객체가 아니라는 결론이 도출된다.
함수의 경우는 조금 더 명확한 차이가 나타난다.
const value = 'global'; |
함수 객체를 Function 생성자를 통해 생성하면 렉시컬 스코프를 생성하지 않고 전역 함수 스코프를 생성한다.
위 코드에서 확인할 수 있듯 생성자를 통한 함수는 블럭 내부의 value가 아닌 전역 환경의 value를 참조한다.
프로토타입 체인
자바스크립트에서 객체의 프로퍼티에 접근할 때 해당 객체에 프로퍼티가 없다면 [[Prototype]] 내부 슬롯을 참조하여 프로토타입의 프로퍼티를 순차적으로 탐색한다.
function User(id) { |
위 예제에서 me 객체에는 hasOwnProperty 메서드가 존재하지 않는다.
이런 경우 다음과 같은 순서로 메서드를 검색한다.
- 해당 객체의 메서드가 없으면 프로토 타입 체인을 이용해 [[Prototype]] 내부 슬롯에 바인딩 되어있는 프로토타입으로 이동하여 검색한다. (me -> User.prototype)
- User.prototype에도 hasOwnProperty가 없으므로 [[Prototype]] 내부 슬롯에 바인딩 되어있는 프로토타입으로 이동하여 검색한다. (User.prototype -> Object.prototype)
- Object.prototype에는 hasOwnProperty가 존재하기 때문에 자바스크립트 엔진은 Object.prototype.hasOwnProperty를 호출하고 이 때 this에는 me객체가 바인딩 된다.
Object.prototype은 모든 프로토타입 체인의 종점이며 모든 객체는 Object.prototype을 상속받는다.
Object.prototype의 [[Prototype]] 내부 슬롯은 null이며 Object.prototype에서도 검색이 불가능한 경우 undefined를 반환한다.
function User(id) { |
오버라이딩, 프로퍼티 섀도잉
function User(id) { |
생성자 함수로 생성한 객체에 생성자 함수 메서드와 같은 이름의 메서드를 추가했다.
이때 프로토타입 체인으로 생성자 함수 메서드를 변경하는 것이 아니라 생성한 객체에 메서드가 추가되고 이를 오버라이딩이라고 한다.
그리고 생성자 함수의 getUserId 메서드는 가려지게 되는데 이를 프로퍼티 섀도잉이라고 부른다.
console.log(myUser.getUserId()); // 1, myUser |
인스턴스의 getUserId를 삭제하면 인스턴스에 등록된 메서드가 삭제되고 호출하게 되면 프로토타입 체인을 통해 생성자 함수의 메서드를 호출한다.
다시 한번 getUserId를 삭제하면 아무 일도 일어나지 않고 호출도 정상 동작한다.
프로토타입 체인을 통해서 get은 허용이 되나 set은 허용되지 않는다.
delete User.prototype.getUserId; |
프로토타입의 프로퍼티를 변경, 삭제하려면 직접 접근해야한다.
직접 접근해서 삭제 후 인스턴스에서 해당 메서드를 호출하면 찾을 수 없다는 에러가 나온다.
프로토타입 교체
프로토타입은 임의의 다른 객체로 변경할 수 있다. 즉, 부모 객체를 변경하여 상속 관계를 동적으로 변경할 수 있다는 것이다.
function User(id) { |
위 코드에서 프로토타입을 객체 리터럴로 교체했다.
객체 리터럴에는 constructor 프로퍼티가 없기 때문에 constructor 검색 시 프로토타입 체인을 통해 객체의 프로토타입인 Object.prototype의 constructor를 반환한다.
만약 프로토타입 교체 시 기존 생성자 함수와의 연결을 유지하고 싶다면 constructor를 추가해주면 된다.
function User(id) { |
프로토타입은 인스턴스를 통해 교체할 수도 있다.
이 경우 __proto__접근자 프로퍼티 또는 Object.setPrototypeOf 메서드를 통해 교체한다.
생성자 함수 교체 방식과 차이점은 생성자 함수를 통한 프로토타입 교체는 앞으로 생성할 모든 객체의 프로토타입을 교체하는 것이고
인스턴스에서의 교체는 현재 객체의 프로토타입만 교체하는 것이다.
function User(id) { |
마찬가지로 constructor는 Object.prototype의 constructor를 반환한다.
이러한 방식으로 프로토타입을 교체했을 때 프로토타입을 기존 생성자 함수와 연결하기 위해는 다음과 같은 처리가 필요하다.
function User(id) { |
인스턴스를 통한 프로토타입 교체 시 생성자 함수 프로토타입과 인스턴스의 연결이 끊기기 때문에 인스턴스에 등록한 프로토타입과 같은 객체를 생성자 함수의 프로토타입에 등록해주어야 한다.
직접 상속
Object.create 메서드를 사용해서 직접 상속을 구현할 수 있다.
Object.create 메서드는 첫 번째 매개변수로 프로토타입 객체를 두 번째 매개변수로 생성할 객체의 프로퍼티 키와 프로퍼티 디스크립터 객체로 이루어진 객체를 받는다.
// obj = {} |
다른 방법으로는 __proto__접근자 프로퍼티를 사용하는 방법이 있다.
const newPrototype = { test: 'test' }; |
프로퍼티 확인
in 연산자를 사용하면 객체 내에 프로퍼티가 존재하는지를 확인할 수 있다.
const user = { |
in 연산자는 대상 객체뿐만 아니라 대상 객체가 상속받은 모든 프로토타입의 프로퍼티를 확인한다.
User 객체에 id와 password 프로퍼티가 존재하기 때문에 true가 반환되고 name 프로퍼티는 존재하지 않기 때문에 false가 반환된다.
hasOwnProperty의 경우 user 객체에는 없지만 프로토타입인 Object.prototype의 메서드이기 때문에 true가 반환된다.
만약 해당 객체에만 존재하는 프로퍼티인지 확인하고 싶다면 Object.prototype.hasOwnProperty 메서드를 사용해야 한다.
user.hasOwnProperty('id'); // true |
프로퍼티 열거
for…in
for…in 문은 객체의 모든 프로퍼티를 순회하여 열거한다.
const user = { |
for…in 문은 프로퍼티의 수만큼 순회하며 프로퍼티 키를 열거한다.
그런데 이 경우 상속받은 프로토타입 프로퍼티도 열거해야 하는데 Object.prototype 프로퍼티가 열거되지 않았다.
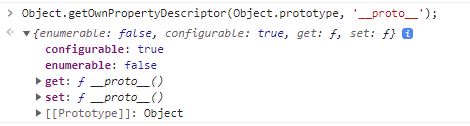
Object.getOwnPropertyDescriptor(Object.prototype, 'hasOwnProperty'); |
그 이유는 Object.prototype의 프로퍼티가 열거할 수 없도록 정의되어있기 때문에다.
만약 아래와 같이 열거할 수 있는 상속 프로퍼티가 존재한다면 해당 프로퍼티를 열거한다.
const user = { |
만약 상속받은 프로퍼티를 제외하고 자신의 프로퍼티만 열거하고 싶다면 아래와 같은 처리를 해주어야 한다.
const user = { |
위의 코드에서는 프로퍼티의 정의 순서대로 열거되었지만 for…in문 자체는 순서를 보장하지 않는다.
다만, 대부분의 모던 브라우저는 순서를 보장하고 숫자를 키로 가지는 프로퍼티에 한해서 정렬을 실행한다.
for…in문은 위와 같이 상속 이슈가 있을 수 있으므로 대신 for문 또는 for…of문 또는 Array.prototype.forEach문을 권장한다.
Object 메서드를 사용하여 열거하는 방법도 존재한다. 이를 사용하면 객체 자신의 고유 프로퍼티만 열거한다.
Object.keys
Object.keys는 객체 자신의 열거 가능한 프로퍼티의 키를 배열 형태로 반환한다.
const user = { |
Object.values
Object.values는 객체 자신의 열거 가능한 프로퍼티의 값을 배열 형태로 반환한다.
const user = { |
Object.entries
Object.entries는 객체 자신의 열거 가능한 프로퍼티의 키와 값의 쌍의 배열을 배열 형태로 반환한다.
const user = { |